I’ve been trying to add SSL to all my “major” rails websites in an effort to increase security, especially since Google will start taking HTTPS into account with page-ranks. Since most if not all of these apps run on Heroku, with the domains provided by Namecheap, I wanted to provide a guide as there are some tricky steps to get it to work properly. I’m not the only one who found it frustrating:
Heroku + NameCheap/Comodo PositiveSSL = Nightmare. When something like this has to exist, avoid it: https://t.co/nN9kGguk — John Sheehan (@johnsheehan) March 22, 2012
https://www.resumonk.com/blog/setup-ssl-certificate-heroku/
So it might be a good first step. But my setup differed slightly, as I was using PositiveSSL, and not RapidSSL, which is what the author of the post was using. So, without further ado, here’s the full step process for having this work with PositiveSSL (Also thanks to Chloe Unrau for getting me the rest of the way there).
Basic Steps:
- Install openssl if you haven’t already (via homebrew, from source, etc.).
- Generate keys using openssl
- Purchase and Activate SSL certificate from Namecheap
- Create server.crt from certificates emailed to you
- Provision Heroku SSL endpoint
- Update your DNS settings on Namecheap
- Force SSL on Production
- Check to make sure SSL is working properly
Just the code:
Install Open SSL: (almost all of this will be done from the command line)
Is OpenSSL already installed? openssl version If already installed, it should return: OpenSSL X.X.Xx D MON YEAR Where X.X.Xx is the version number (1.0.1a for example) and D MON YEAR is the day month and year – eg something like 31 Mar 2014 If it’s not installed, it will say something like -bash: openssl: command not found In which case you need to install it.
- On Ubuntu:
sudo apt-get install openssl - On Mac:
brew install openssl(this assumes you have Homebrew installed)
Generate Keys Using OpenSSL
Run the command from a folder or location you’ll remember it: openssl genrsa -des3 -out server.pass.key 2048 This should lead to the output: Generating RSA private key, 2048 bit long modulus ......+++ ............................................................................................................+++ e is 65537 (0x10001) Enter pass phrase for server.pass.key: Go ahead and enter a passphrase here if you want. I generated a random one with > 14 random digits/numbers/symbols. Be sure to remember this code as you might need it later. Now run: openssl rsa -in server.pass.key -out server.key This should lead to the output: Enter pass phrase for server.pass.key: Enter the passphrase we entered earlier. Now it should say: writing RSA key Once that is complete (instantaneous), run the next command: openssl req -nodes -new -key server.key -out server.csr You’ll then be prompted with the following fields: Country Name (2 letter code) [AU]: See: http://www.ssl.com/csrs/country_codes. For those living in the United States, it’s `US` (without the quotes) State or Province Name (full name) [Some-State]: Full name of the state, eg `California` Locality Name (eg, city) []: For us living in the US, most likely a city. So something like `San Francisco` Organization Name (eg, company) [Internet Widgits Pty Ltd]: Name of your company: eg ExampleCo, Google, etc. Organizational Unit Name (eg, section) []: I just used “Web Security” for mine. They are looking for a department (Marketing, etc). Common Name (e.g. server FQDN or YOUR name) []: BE CAREFUL WITH THIS ONE! This is your domain url, e.g. www.example.com. Email Address []: Put a good email contact here, something like [email protected] Please enter the following 'extra' attributes Feel free to skip past any last “extra” attribute things, they shouldn’t affect anything.
Purchase and Activate SSL certificate from Namecheap
For our rails apps, we’ll really only need an SSL Certificate for Domain Verification, which should be listed here:
https://www.namecheap.com/security/ssl-certificates/domain-validation.aspx
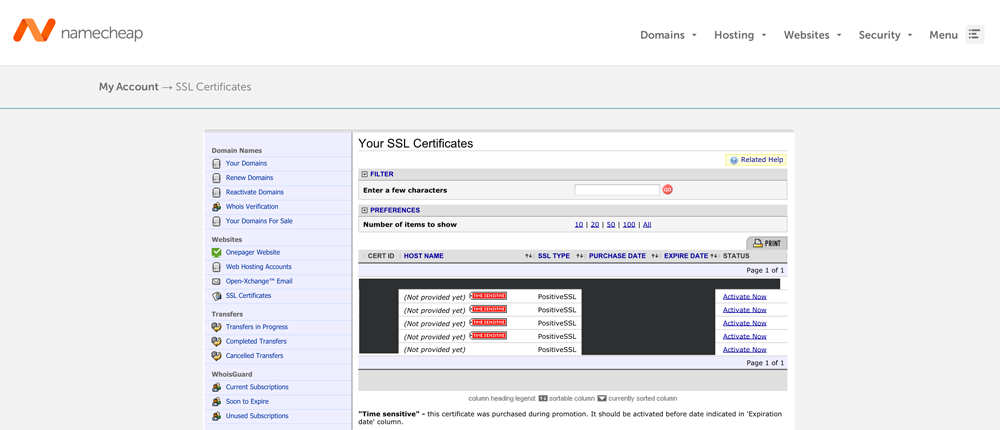
They’ll run you anywhere from $9/year – $150/year (current prices: September 2014). The more expensive ones usually are for wildcard domains, for when you need ssl certs for not only www.example.com and example.com, but also mail.example.com, news.example.com, etc. I purchased the PositiveSSL basic ($9.00/year), which I believe covers both https://www.example.com and https://example.com (the “naked” domain). Once you have purchased some SSL certs, they should appear in your account here:
https://manage.www.namecheap.com/myaccount/ssl-list.asp
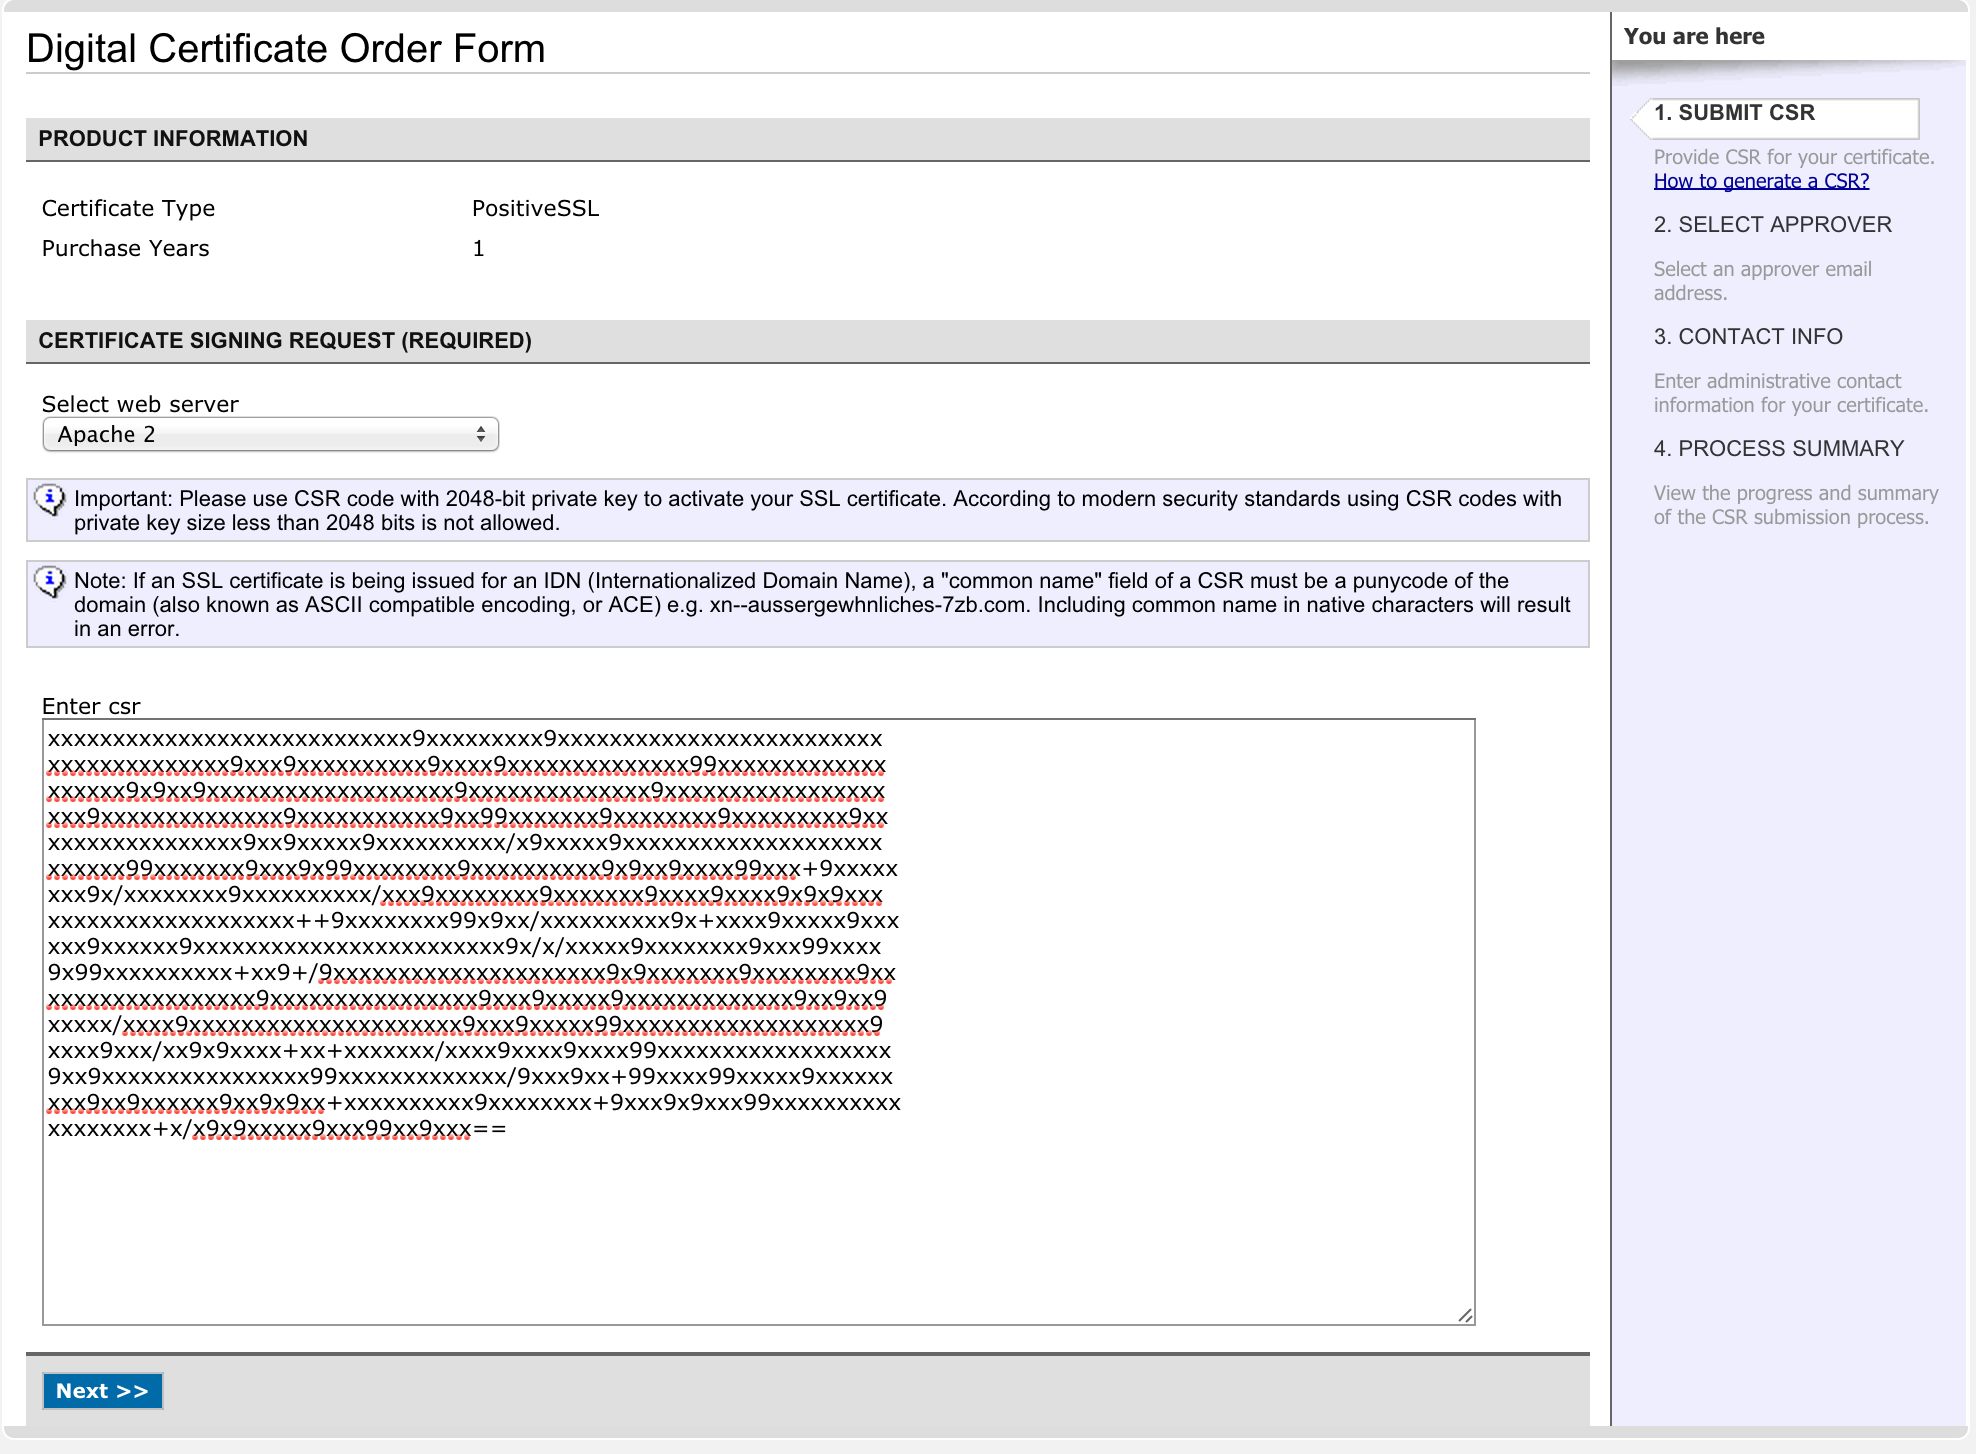
The page will look like this:  Click “Activate Now” next to an SSL certificate you have not yet initiated. You will be taken to a new page that asks you to verify some details. First, go back to where you generated the server.csr, server.key, and server.pass.key files. Open up server.csr, and copy everything between the BEGINNING and END blocks. It should look something like:
 xxxxxxxxxxxxxxxxxxxxxxxxxxxx9xxxxxxxxx9xxxxxxxxxxxxxxxxxxxxxxxxx xxxxxxxxxxxxxx9xxx9xxxxxxxxxx9xxxx9xxxxxxxxxxxxxx99xxxxxxxxxxxxx xxxxxx9x9xx9xxxxxxxxxxxxxxxxxxx9xxxxxxxxxxxxxx9xxxxxxxxxxxxxxxxx xxx9xxxxxxxxxxxxxx9xxxxxxxxxxx9xx99xxxxxxx9xxxxxxxx9xxxxxxxxx9xx xxxxxxxxxxxxxxx9xx9xxxxx9xxxxxxxxxx/x9xxxxx9xxxxxxxxxxxxxxxxxxxx xxxxxx99xxxxxxx9xxx9x99xxxxxxxx9xxxxxxxxxx9x9xx9xxxx99xxx+9xxxxx xxx9x/xxxxxxxx9xxxxxxxxxx/xxx9xxxxxxxx9xxxxxxx9xxxx9xxxx9x9x9xxx xxxxxxxxxxxxxxxxxxx++9xxxxxxxx99x9xx/xxxxxxxxxx9x+xxxx9xxxxx9xxx xxx9xxxxxx9xxxxxxxxxxxxxxxxxxxxxxxx9x/x/xxxxx9xxxxxxxx9xxx99xxxx 9x99xxxxxxxxxx+xx9+/9xxxxxxxxxxxxxxxxxxxxx9x9xxxxxxx9xxxxxxxx9xx xxxxxxxxxxxxxxxx9xxxxxxxxxxxxxxxx9xxx9xxxxx9xxxxxxxxxxxxx9xx9xx9 xxxxx/xxxx9xxxxxxxxxxxxxxxxxxxxx9xxx9xxxxx99xxxxxxxxxxxxxxxxxxx9 xxxx9xxx/xx9x9xxxx+xx+xxxxxxx/xxxx9xxxx9xxxx99xxxxxxxxxxxxxxxxxx 9xx9xxxxxxxxxxxxxxxx99xxxxxxxxxxxxx/9xxx9xx+99xxxx99xxxxx9xxxxxx xxx9xx9xxxxxx9xx9x9xx+xxxxxxxxxx9xxxxxxxx+9xxx9x9xxx99xxxxxxxxxx xxxxxxxx+x/x9x9xxxxx9xxx99xx9xxx== For “Select web server”, choose “Apache 2”. Your page should now look like:  I’ve obviously put a non working key here, you’ll have to use your own 😉 It might ask for an admin email to send to. While you could setup your own email server, email forwarding will work as well. Go to the list of all your domains (https://manage.www.namecheap.com/myaccount/domain-list.asp), click on your domain, and select “Email Forwarding Setup” from the left hand side. Then create a forwarding email like [email protected] that forwards to [email protected]. After a few minutes, you should get an email that asks you to confirm that you asked to issue a SSL certificate. Click the link provided and enter in the verification code they provided for you.
Create server.crt from certificates emailed to you
We’re almost there! After confirming our SSL certificates, you will get emailed a zip file with the following four files:
- Root CA Certificate – AddTrustExternalCARoot.crt
- Intermediate CA Certificate – COMODORSAAddTrustCA.crt
- Intermediate CA Certificate – COMODORSADomainValidationSecur
eServerCA.crt - Your PositiveSSL Certificate – www_example_com.crt
This is where the the original guide differed – that guide says I would be emailed 2 certificates, and yet I have 4 here! What do I do! Well, it’s as simple as running the command: cat www_example_com.crt COMODORSADomainValidationSecureServerCA.crt COMODORSAAddTrustCA.crt AddTrustExternalCARoot.crt > server.crt No need to worry about forgetting to copy certain pieces, or forgetting line breaks, or any of that! Boom! File!
Provision Heroku SSL endpoint
In your rails app folder that you want to add SSL to, run: heroku addons:add ssl:endpoint Now gather your server.crt file that you created just a second ago, and find your server.key that you generated from one of the first beginning steps. Once they are all in the same location, run: heroku certs:add server.crt server.key You should now see your console say something like: Adding SSL Endpoint to example... done example now served by xxxx-9999.herokussl.com. Where XXXX is a fancy name (rosebud), and 9999 is a number (very similar to generating an app on heroku without naming it) Update your DNS settings on Namecheap Now either update or create your DNS records on NameCheap to point to the new domains. Go back to all your domains (https://manage.www.namecheap.com/myaccount/domain-list.asp), click on your domain, then click on “All Host records” once that page loads (on the left side list). Your records should look something like: HOST NAME IP ADDRESS/URL RECORD TYPE @ https://www.example.com URL REDIRECT www xxxx-9999.herokussl.com CNAME(ALIAS)
Force SSL on Production
Go to config/environments/production.rb and there should be a commented out line that says: config.force_ssl = true Go ahead and uncomment that line out and push up to Heroku.
Check to make sure SSL is working properly
Did it work? Are we done? Only one way to check. Wait about 10 minutes (usually sooner, mine worked about 2-3 minutes after), and then visit your https website — it should work! Problems? Try using https://www.digicert.com/help/ to check to see what problems it can find with your SSL certificate.
Resources
I stood heavily on the shoulders of other people out there that had already compiled a lot of this list. Here is the full list of my resources:

Comments are closed, but trackbacks and pingbacks are open.